Technique
Wet-on-Wet Washes
How to lay a flat wash, a graded wash and a wet-on-wet sky: water-to-pigment ratio, board tilt, brush loading and the timing that decides the result.
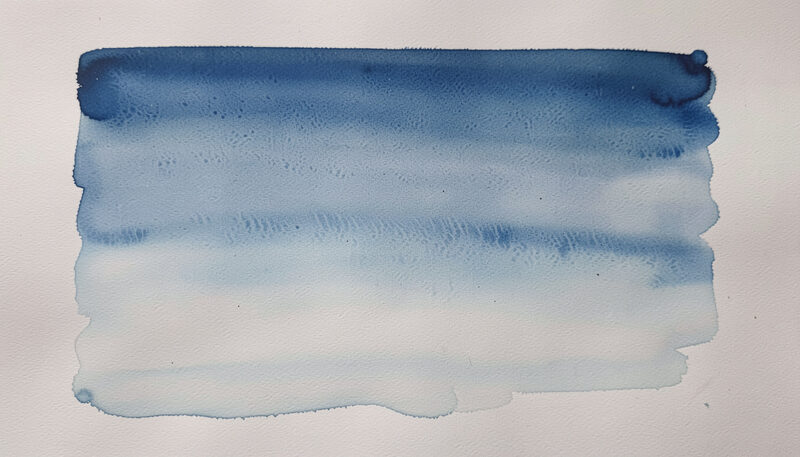
A wash is the foundation of nearly every watercolor. It is a single, even film of dilute paint laid across the paper, and it can be flat, graded or variegated. Learning to lay a clean wash without streaks, hard edges or backruns is the first real skill in the medium, and it is worth practicing on its own before it is asked to hold a sky or a wall.
What a wash is
A wash is pigment held in a great deal of water. The paint is mixed in the palette to the strength wanted, then carried across the paper in overlapping strokes before any of it has time to dry. The water keeps the edge of each stroke open so the next stroke merges into it. When the wash is finished, the whole area dries at the same rate and the tone is even. If the paper dries between strokes, each stroke leaves a mark and the wash breaks into stripes.
Laying a flat wash
Mix more paint than seems necessary, because a wash cannot be corrected halfway. Tilt the board slightly so the water runs gently toward the lower edge, but not so much that it pools. Wet the brush well and lay a horizontal stroke across the top of the area. Without rinsing, reload and lay the next stroke just below it, touching the first, letting the bead of water at the bottom of the first stroke pull the new paint down. Continue to the bottom, then squeeze the brush dry and lift the last bead so it does not dry as a dark line. Keep the brush moving and do not go back over an area that has started to dull.
A graded wash
A graded wash runs from dark at one edge to light at the other. It is made by adding water to the brush, or by dipping the brush in clean water, with each successive stroke. The color is strongest in the first stroke and palest in the last. This is how a sky is built, dark at the top of the sheet and nearly white at the horizon, and how a wall or a road is made to recede. The trick is to commit to the whole passage in one go, because the graduation is lost if the painter stops to think in the middle.
Wet-on-wet
Wet-on-wet means dropping pigment into paper that has already been dampened with clean water. The paint spreads by itself, feathering at the edges and mixing with whatever is already there. It is the technique for soft clouds, distant hills, the first wash of foliage and any subject with a soft, indefinite edge. The result depends entirely on how wet the paper is. On very wet paper the paint blooms freely and may run off the area; on paper that is only damp, the spread is short and controlled. A painter learns to judge the sheen of the surface, neither glossy nor matte, and to work quickly once pigment is dropped in.
Water, pigment and board tilt
The strength of the wash is set by the ratio of water to pigment, and the flow is set by the tilt of the board. A steep tilt makes the water run down and can leave a tide mark; a flat board lets the wash sit and dry slowly. For a sky, a slight tilt helps the graded wash move toward the horizon. For a small shape, the board is kept almost flat so the wash stays where it is put. Adjusting the tilt is often easier than fighting the water with the brush.
Timing and edges
The edge of a wash is decided by when the painter stops touching it. Lift paint or add color while the surface is still damp and the edge stays soft. Leave it until the surface is dry and the edge is fixed and hard. A painting needs both kinds of edge, and the skill is to choose deliberately. Painting wet-on-dry, in which new paint is laid on a dry area, gives a crisp shape and is used for the foreground, a roof line or a branch. Painting wet-on-wet gives atmosphere and distance.
Working wet-on-dry
The opposite of a wet-on-wet wash is a wash laid on dry paper, called wet-on-dry. The paint sits where it is put and the edge stays crisp, which is exactly what is wanted for a roof, a wall in sunlight, a distant field or a branch. Because the paper does not pull the paint outward, the painter has more control and can build a shape with a definite boundary. Most paintings use both approaches: the soft distance is painted wet-on-wet, while the sharp foreground is painted wet-on-dry on top of the dry layers beneath.
The trap with wet-on-dry is that the edge can look mechanical if it follows the outline too literally. A painter softens part of the edge while it is still damp, or breaks the shape into two or three strokes rather than one, so the boundary reads as a real object rather than a cutout. Practicing a few simple shapes, a hill, a barn, a tree trunk, on a spare sheet teaches the difference quickly.
A worked sky, step by step
To see how the washes combine, try a small sky. Mix a puddle of blue deep enough that it dries a shade lighter than the target. Wet the top two thirds of the sky area with clean water and let it settle for a moment so the sheen is even. Lay the blue across the top with a large brush and pull it down, adding clean water with each stroke so it fades toward the horizon. While the wash is still damp, take out two or three cloud shapes with a clean, barely moist brush or a crumpled tissue, pressing gently and lifting without scrubbing. Leave the wash alone until it is completely dry. Then, with a smaller brush and a warm gray, darken only the undersides of the clouds that face away from the light. The result is a sky with soft tops and harder undersides, built entirely from the washes described above.
Common faults
A striped wash means the paper dried between strokes. A hard rim at the bottom means the last bead was left to dry. A backrun, sometimes called a bloom or a cauliflower, appears when wet paint is added to an area that was drying: the water pushes the pigment outward and leaves a pale, ragged center. All three are easier to prevent than to repair. If a fault does appear, the troubleshooting guide explains what can be lifted, softened or left as part of the picture. From here, the next step is glazing and layering, which uses a dry wash as the base for the layer above.
A flat wash rarely stays a background for long. In a picture book spread, the same even tone becomes the ground that carries figures, horizon and sky across a gutter, and its value has to hold when the page is printed at a small trim size. Painters moving from single sheets to sequential images face questions of pacing, palette and revision that a wash alone does not answer. A guide on flat washes behind a drawing in picture book work, Watercolor Picture Books: Spreads, Palette, Revisions, follows those decisions from the first sketch to the final pass.
A single wash, repeated until the hand stops hesitating, teaches more than a dozen new subjects. The step from that practice to a routine is short: the same paper, the same brush, the same mix, ten minutes set aside before anything else. Accuracy arrives before speed, and fatigue is managed with warm-up strokes and brief pauses rather than longer sessions. A structured version of this habit, with the desk and board arranged so brush and eye sit right, is set out in the same wash every day, a ten-minute drill from this magazine.